
Are you tired of sweltering heat invading your cozy space, even when your fans are working overtime? If you’re looking for a quick and efficient way to cool down your room, installing a portable AC in your sliding window might just be the perfect solution.
Many think this is a complex task, but it’s surprisingly straightforward once you know how. Imagine feeling that refreshing breeze as you relax in your favorite chair, all thanks to a simple setup process. In this guide, you’ll discover step-by-step instructions tailored to make the installation a breeze, even if you’re not a DIY expert.
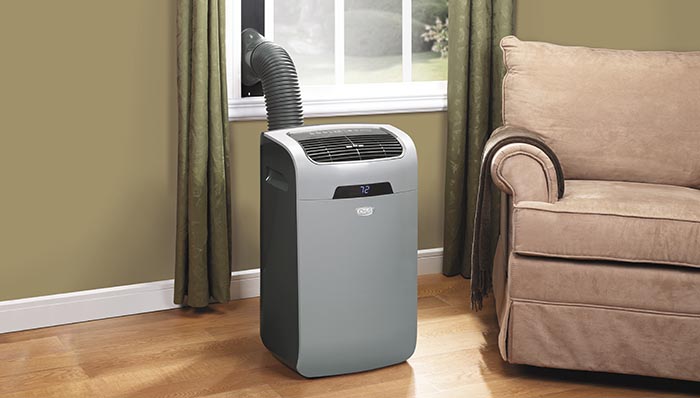
If you’re wondering How to Install Portable AC in Sliding Window, the process is simple with the right window kit. First, measure your window opening, place the sliding panel insert, and connect the exhaust hose securely. Sealing any gaps is key to prevent hot air leaks and ensure your portable air conditioner runs efficiently all summer.
Unleash the potential of your portable AC and transform your home into a cool haven. Dive in to learn how you can master this installation and enjoy a more comfortable living space.
Choosing The Right Portable Ac
Installing a portable AC in a sliding window involves securing the exhaust hose and adjusting the window panel. Begin by attaching the hose to the AC unit, then fit the adjustable panel in the window track. Ensure a snug fit to keep warm air out and cool air in.
Choosing the right portable AC can make a significant difference in your comfort and energy bills. It’s not just about picking any model; you need to ensure it meets your needs and fits your space. Let’s break down what you should consider when selecting the perfect portable AC for your sliding window.
Assessing Cooling Capacity
First, consider the size of the room you want to cool. Portable ACs come with different cooling capacities, typically measured in BTUs (British Thermal Units). A small room, like a bedroom or office, might need a unit with around 8,000 BTUs. Larger spaces, such as a living room, could require a model with 12,000 BTUs or more.
Measure the square footage of your room. This helps in choosing a unit with the right BTU rating. A unit that’s too powerful can cycle on and off too quickly, wasting energy, while one that’s too weak won’t cool efficiently.
Energy Efficiency Considerations
Energy efficiency is crucial for keeping your electricity bills in check. Look for units with a high EER (Energy Efficiency Ratio). A higher EER means the unit uses less energy to cool your space, which is better for both your wallet and the environment. Check if the portable AC has an Energy Star rating.
This certification means the model meets energy efficiency guidelines set by the U.S. Environmental Protection Agency. Energy-efficient models might cost a bit more upfront but save money over time. Lastly, consider additional features like programmable thermostats or sleep modes.
These can further enhance energy efficiency by allowing you to control when and how the unit runs. Do you have a preference for energy-saving features that can ease your lifestyle and reduce costs? Choosing the right portable AC involves more than picking a popular brand. It’s about understanding your needs, the space you’re in, and how you can optimize for both comfort and cost.
Credit: diy.stackexchange.com
Preparing The Sliding Window
Preparing your sliding window for a portable AC installation might seem daunting, but with the right approach, it’s quite straightforward. You’ll need to ensure your window is ready to securely hold the AC unit while preventing any air leaks. This process involves precise measurements and assembling tools that will make installation a breeze. Let’s dive into how you can prepare your sliding window efficiently.
Measuring Window Dimensions
Start by measuring the width and height of your sliding window. Use a tape measure for accuracy. Remember, the dimensions are crucial as they determine if your portable AC fits snugly. Check both the inner and outer frame.
Imagine the satisfaction of having a perfectly fitted AC that doesn’t wobble or leak. Ensuring proper dimensions is the first step in achieving that.
Gathering Necessary Tools
Once you have your measurements, gather the tools required for installation. You’ll need a screwdriver, a level, and possibly a saw if adjustments are needed. Keeping these handy will save you from interruptions.
Consider this: how much smoother will your installation be with everything at your fingertips? Ensure you have all tools ready to avoid running back and forth.
Now, ask yourself, is your sliding window prepared to host your new portable AC? With precise measurements and the right tools, you’re halfway there! By tackling these initial steps, you’re setting yourself up for a successful installation. Embrace the process and enjoy a cooler space in no time.
Installing The Window Kit
Setting up a portable AC in a sliding window is simple. The window kit plays a crucial role. It ensures efficient cooling and easy installation. Follow the steps for a hassle-free experience.
Understanding Kit Components
First, lay out all the components. Most kits include a window panel, screws, and sealing foam. The panel fits into the sliding window gap. The foam creates a seal to prevent air leaks. Check the instruction manual. It will help identify each part.
Securing The Window Panel
Place the window panel in the sliding window. Adjust its length to fit snugly. Use the provided screws to secure it. Tighten them gently to avoid damage. Ensure the panel is stable. No gaps should remain between the panel and window.
Next, apply the sealing foam. Stick it around the edges of the panel. This step is vital. It blocks unwanted air and insects. Double-check the panel’s stability. Make sure it can hold the exhaust hose firmly.
Connecting The Exhaust Hose
To connect the exhaust hose, secure one end to the portable AC unit. Extend the hose to the window kit and attach it firmly, ensuring no air leaks. Adjust the sliding window panel to fit the hose snugly, completing the installation.
Connecting the exhaust hose is a vital step in setting up your portable air conditioner in a sliding window. Without a proper connection, the unit won’t efficiently expel hot air outside, compromising its cooling capacity. As someone who’s battled with sweltering summers, I can assure you that a seamless hose installation can be the difference between a cool haven and a heatwave indoors.
Attaching Hose To The Unit
Begin by locating the exhaust outlet on your portable air conditioner. This is usually at the back or side of the unit. You might find it helpful to consult your manual for specific instructions. Securely attach one end of the exhaust hose to the outlet.
Most hoses come with a coupling that clicks or twists into place. Ensure it’s snug to prevent any air leaks, which could reduce efficiency. If you’ve ever had a hose come loose in the middle of a hot day, you know the chaos it can cause. Double-check the connection to avoid this mishap.
Positioning Hose In The Window
Next, position the other end of the hose into the sliding window. Many portable AC units come with a window kit that includes panels to fit the gap in the window. Place the hose through the opening in the panel and extend it to its full length. Make sure the hose is straight and free of kinks, which can obstruct airflow.
Consider the layout of your room. Is the hose positioned in a way that doesn’t block pathways or furniture? Ensuring a clear path will make your space more comfortable. In my experience, a poorly positioned hose can be a tripping hazard.
Keep it tidy and out of the way for a seamless setup. Have you ever considered the impact of improper hose installation on your air conditioner’s performance? A few extra minutes spent on positioning can save you hours of discomfort later.
Ensuring A Tight Seal
Install your portable AC securely by ensuring a tight seal in your sliding window. This prevents warm air from entering, improving efficiency. Use foam strips or weatherstripping to fill gaps, keeping your room cool and comfortable.
Installing a portable air conditioner in a sliding window can be a game-changer for keeping cool, especially during those scorching summer months. However, to maximize efficiency, ensuring a tight seal around your unit is crucial. Without a proper seal, cool air escapes, and warm air seeps in, defeating the purpose of your portable AC. So, how do you ensure your unit is snugly installed? Let’s dig into some practical steps.
Using Weather Stripping
Weather stripping is your best friend in this mission. It fills gaps around the AC unit, preventing unwanted airflow. Start by measuring the space around your unit. Cut the weather stripping to size and apply it around the edges. This simple addition can drastically improve your AC’s efficiency. I once skipped this step, and my living room felt more like a sauna than a sanctuary. Trust me, you don’t want that experience.
Checking For Air Leaks
After installing weather stripping, check for any air leaks. Light a candle and move it around the edges of the window. Flickering indicates a leak. Seal these leaks with additional weather stripping or adhesive foam tape. This method is quick and effective. Have you ever wondered why your room isn’t cooling despite a running AC? It might just be those sneaky leaks. Ensuring a tight seal is not just about comfort—it’s about efficiency. With these steps, your portable AC will serve you well, even in the hottest weather. Remember, every small step you take in sealing your unit translates to a cooler, more comfortable home.

Credit: www.youtube.com
Final Setup And Testing
Ensure the portable AC is securely fitted in the sliding window. Plug it in, and turn it on. Check for cool air flow and inspect for any leaks or gaps around the window frame to guarantee efficient operation.
After successfully positioning your portable AC unit in the sliding window, you are almost at the finish line. The final setup and testing are crucial to ensure everything runs smoothly. This step will determine the efficiency and effectiveness of your newly installed unit. Are you ready to experience a perfectly chilled room? Let’s dive into the final touches!
Powering Up The Ac
First, plug your portable AC into a dedicated power outlet. Make sure the outlet can handle the unit’s power requirements. It’s essential to avoid using extension cords to prevent overheating. Turn on the unit by pressing the power button. Adjust the settings to your desired temperature and fan speed. This moment marks the first breath of cool air flowing into your room. If your AC has a remote control, test it from different spots in the room. Does it respond quickly? This ensures you can control the temperature without getting up.
Monitoring Performance
Listen closely to the unit for any unusual noises. A quiet hum is typical, but rattles or clunks might mean something is amiss. This is your chance to catch any issues early. Feel the air around the room to check if it’s evenly distributed. Is one corner cooler than the other? Adjust the airflow direction and fan speed to balance the room’s temperature. Finally, monitor the condensation drainage. Make sure it’s flowing properly if your AC has a hose or a collection tray. A blockage can lead to leaks or reduced efficiency. Through this process, you ensure your portable AC is set up for optimal performance. Now, your room should be a comfortable oasis. Isn’t it satisfying to know that a few extra checks can make all the difference?
Maintenance Tips
Installing a portable AC in a sliding window involves securing the window kit properly. Ensure the seal is tight to prevent air leaks. Following the instructions carefully helps maintain efficiency and comfort.
Maintaining your portable AC effectively ensures it runs smoothly and lasts longer, especially when you’ve installed it in a sliding window. You might think the installation was the hard part, but regular maintenance plays a key role in keeping your AC efficient. Let’s dive into some maintenance tips that will help you keep your portable AC in top shape.
Cleaning The Filter
One of the simplest yet most crucial tasks is keeping the filter clean. A clogged filter can reduce the efficiency of your AC, making it work harder and consume more energy. Imagine the relief of a gentle breeze on a hot day; that’s what a clean filter can provide. To clean the filter, remove it according to the manufacturer’s instructions. Rinse it gently with warm water and allow it to dry completely before reinserting it. Doing this every two weeks is ideal, especially during peak usage periods. Have you ever noticed a drop in cooling performance? The filter might be the culprit.
Storing The Ac In Off-season
When the cooler months roll in, it’s time to think about storing your portable AC properly. This not only protects it from dust and damage but also ensures it’s ready for action when summer returns. First, make sure to drain any remaining water from the unit. This prevents mold growth and unpleasant odors. Next, clean the exterior and interior parts, including the filter, thoroughly. A dry unit is a happy unit, so ensure everything is completely dry before storing. Finally, find a dry, cool place to store your AC. Cover it with a protective sheet to keep it dust-free. Have you ever pulled out an appliance only to find it covered in dust and cobwebs? A little prep now saves a lot of hassle later. Maintaining your portable AC doesn’t have to be a chore. With these simple tips, you’re not just ensuring your comfort; you’re extending the life of your unit. What other appliances might benefit from a little extra care?

Credit: www.amazon.com
Frequently Asked Questions
Can You Install A Portable Air Conditioner In A Sliding Window?
Yes, you can install a portable air conditioner in a sliding window. Use a window kit for proper sealing. Ensure the exhaust hose fits securely to vent hot air outside. Follow the manufacturer’s instructions for best results. This setup enhances cooling efficiency and comfort in your space.
Can You Install A Window Ac In A Side Sliding Window?
Yes, you can install a window AC in a side sliding window. Use a special bracket or kit designed for horizontal installations to ensure stability and safety. Make sure to seal any gaps properly to maintain efficiency and prevent air leaks.
How To Secure Window Ac In Sliding Window?
Secure a window AC in a sliding window using a support bracket. Seal gaps with foam insulation strips. Ensure the unit sits level and lock the window to prevent movement. Regularly check for stability and adjust as needed for safety.
Can A Window Air Conditioner Fit In A Window That Slides Vertically?
Yes, a window air conditioner can fit in a vertically sliding window. You may need a support bracket. Ensure proper sealing to prevent air leaks. Check the air conditioner’s dimensions and window size for compatibility.
Conclusion
Installing a portable AC in a sliding window is simple. Just follow the steps carefully. Ensure you have all the necessary tools ready. Measure your window and AC unit accurately. Secure the AC unit with the window kit. Seal any gaps for better efficiency.
Check that everything is stable and secure. Enjoy your cool, comfortable space. Remember to clean the filter regularly. This keeps your AC running smoothly. With these steps, you can enjoy a cooler home. Portable ACs are a great way to beat the heat.
Stay cool and comfortable all summer long.


